
Images can be inserted in to pages using the small icon in the wysiwyg bar, the one that looks like a small green tree. If you mouse over it, it is called "Insert/Edit image".
There are several steps to this.
Inserting an image that you need to upload
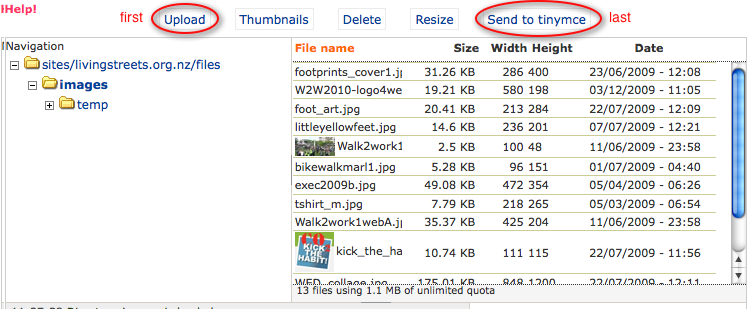
There are various folders that can have images in them, and access to some of these will be restricted. You should have access to your 'own' folder and to the images folder.
When you click on the "Insert/Edit image" icon a new window opens. In the top right of this is a button you need to click to be able to upload an image.
This opens a new window (see below) where you need to click on the word upload so you can browse your computer to find the image you want to upload. You then follow the 3 steps highlighted in colour.
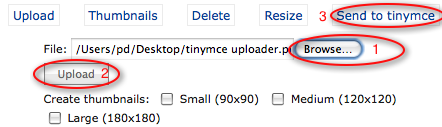
- Use Browse to find the file on your local machine
- When you have selected the file you want from your machine use Upload to transfer it to your folder on the website
- When you have uploaded it you can Send to tinymce to pass it through to the first 'insert/edit' screen that you were on before so you can then set how you want it to show on the page.
Once you find it, you then click on upload and then click on 'send to tinymce' which takes you back to the insert image screen. (So basically this step has been getting the image from your computer to the folders on the website, and then selecting that image for putting in to the page you are editing.)
This then returns you to the first screen where you need to add a description and/or Title
If you want the image to be on the right with text on the left, go to Appearance and click on Alignment and choose 'right' as the position of the image.
You can also change the dimension of the image if you need it to be smaller - though you can also do this after inserting it simply by clicking on the image, and using the handles at each corner to resize it. You may also need to put a 5 in the Vertical and Horizontal space boxes just to add a bit of a gap between the image and the surrounding text.
If you need to move the image once it is in the editor screen (ie where you are doing your typing) you can just select it and drag it - you need to keep a careful eye on whether the cursor is moving to, not the image itself. The image will be inserted where the cursor is when you release it. If you want the image on the right you can still insert the image/cursor over on the left.
Inserting an image that has already been uploaded
The only difference here is that you can skip the 'upload' and just search for the image in the folders that you have access to.
Other steps
Other things you will need to do to make the page behave is
- set the Input Format (find it just below the Body where you are doing the typing) and set it to 'Full HTML' so the instructions such as 'place the image on the right' are implemented.